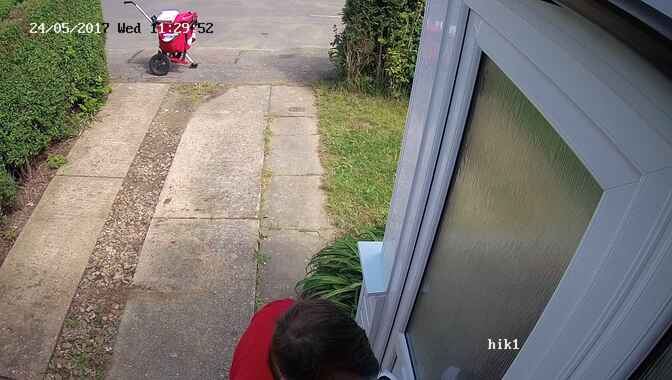
One of the features of our smart home is when the doorbell on our house is rung or a letter is posted, a snapshot is taken by a security camera pointed to our front door. The snapshot is then sent to a neural network to identify if it’s the post or not. If it is then house will announce this to us, which is handy to decide if it’s worth getting up from the sofa to pick up letters / answer the door.
The model itself is a CNN binary classifier trained on about 1,000 images (using Keras tensorflow):
model = Sequential([
    RandomZoom(0.05, 0.05), # data augmentation (training only)
    Rescaling(1/127.5, -1), # rescale values to uniform [-1, 1]

    Conv2D(32, (3, 3), activation='relu', input_shape=input_shape),
    MaxPooling2D(pool_size=(2, 2)),

    Conv2D(32, (3, 3), activation='relu'),
    MaxPooling2D(pool_size=(2, 2)),

    Conv2D(64, (3, 3), activation='relu'),
    MaxPooling2D(pool_size=(2, 2)),

    Flatten(),
    Dense(32, activation='relu'),
    Dropout(0.5),
    Dense(1, activation='sigmoid'),
])
For some time I’d been running the model on AWS Lambda - a cloud service for hosting stateless ‘functions’. It was a bit of a hack though, as the various python libraries required (tensorflow, numpy, scipy) are chunky and pretty close to the 250MB deployment limit, so I’d had to employ some tricks like stripping various unused bits of libraries out before deploying. Also, it wasn’t exactly fast - on average an answer would take a good few seconds to come back (by which time it loses relevance if there’s someone standing waiting on your doorstep!). Lastly, I’m not that keen on images from my house being sent up to the cloud.
Having upgraded the main computer of my home automation to a Pi 4, I figured it was time to work out how to run the model locally instead (and also if it’d be fast enough?). One painful part of deploying some python libraries to the Pi is because it’s ARM often pre-built wheels aren’t available - and compile times on the device can be long for big libraries. Thankfully there’s a great resource www.piwheels.org that provides binaries. Unfortunately they’re only for the official Raspberry Pi OS (formerly Raspbian), and I prefer to run Arch Linux.
In theory piwheels should run on any linux as long as the python version matches. Arch is python 3.8 (at the moment), whilst Pi OS is 3.7, so I went the docker route using the python:3.7 image, but unfortunately this was still too slow. Essentially loading the whole tensorflow framework just to run inference is asking a bit too much of the humble Pi.
Another unfortunate limitation is they appear to have stopped building tensorflow beyond 1.14.0, and though I’d originally trained my models on tensorflow 1, I’d like to update to 2 eventually.
So I went back to the drawing board - Tensorflow lite exactly. I’ve heard more about lite in the context of running Tensorflow at the edge (on lesser powered hardware), so it seemed like this would be good for the Pi too.
The process of converting Keras models to tensorflow lite format is dead simple - just a case of calling a converter and saving it.
Tensorflow lite models can be run using the python package tensorflow.lite, but this is part of the monstrous tensorflow so that’d be no good. Thankfully there’s a tflite_runtime package containing just the parts needed for inference alone, and it’s much smaller (just 1.1MB).
The code to run the inference is slightly more involved, so I’ll reproduce it here for my case:
import numpy as np
import tflite_runtime.interpreter as tflite
from PIL import Image

interpreter = tflite.Interpreter(model_path='model.tflite')
interpreter.allocate_tensors()
input_details = interpreter.get_input_details()
output_details = interpreter.get_output_details()

_, img_height, img_width, _ = input_details[0]['shape']

def load_image(data):
    im = Image.open(data)
    im.load()
    if im.size != (img_width, img_height):
        im = im.resize((img_width, img_height), Image.BILINEAR)
    if im.mode != 'RGB':
        im = im.convert('RGB')
    return np.array(im, dtype=np.float32)

# Get input and output tensors.
def model_predict(data):
    tensor = load_image(data)
    # model expects shape: (batch_size, height, width, channels)
    tensor = np.expand_dims(tensor, axis=0) # (1, height, width, channels)

    interpreter.set_tensor(input_details[0]['index'], tensor)
    interpreter.invoke()
    output_data = interpreter.get_tensor(output_details[0]['index'])
    return output_data[0][0] # batch #0, prediction

def main(argv):
    for filename in argv[1:]:
        confidence = model_predict(filename)
        print(filename, confidence)

if __name__ == '__main__':
    main(sys.argv)
Basically, open the image, resize it and convert to a tensor, then set_tensor() on the input, invoke() the interpreter, and then get_tensor() for the output prediction.
Reassuringly it produces results entirely consistent with running the same inference directly in full tensorflow.
Google kindly provides tflite_runtime pre-built wheels for python 3.5, 3.6, 3.7 and 3.8 on ARM, ARM64, x86-86, etc. Unfortunately if you try to set this up in docker python:3.8 (which is based on debian buster), it fails with an error about ‘glibc_2.29’ not found - annoyingly buster is too old.
So instead I built a docker image from ubuntu:20.04 - this worked and was much faster (~1.2s) than the tensorflow v1 solution (3.6s), but in the end I opted to just go native with a python virtual environment.
I installed numpy and Pillow from OS packages to save having to compile them:
$ pacman -Sy python-numpy python-pillow
And then created the virtualenv using system libraries (I know, dirty..):
$ python -m venv --system-site-packages ~/.local/share/virtualenvs/postman
On Pi OS you could install these from piwheels.
Finally I could install the rest of the dependencies:
$ source ~/.local/share/virtualenvs/postman/bin/activate
$ pip install https://github.com/google-coral/pycoral/releases/download/release-frogfish/tflite_runtime-2.5.0-cp38-cp38-linux_armv7l.whl
And it worked! Fast too - about 0.3s to run the inference (which includes loading the model).
Result!
Some relevant links:
- 3 ways to install tensorflow on the Raspberry Pi (saw this after publishing my article)
- a great benchmarking post